通过 USB 转串口实现 Android 与单片机的通信,实验器材如下:
- Node Muc ESP-12E
- Micro-USB 数据线
- OTG 数据线
- 支持 OTG 功能的 Android 手机
1. ESP-12E 程序
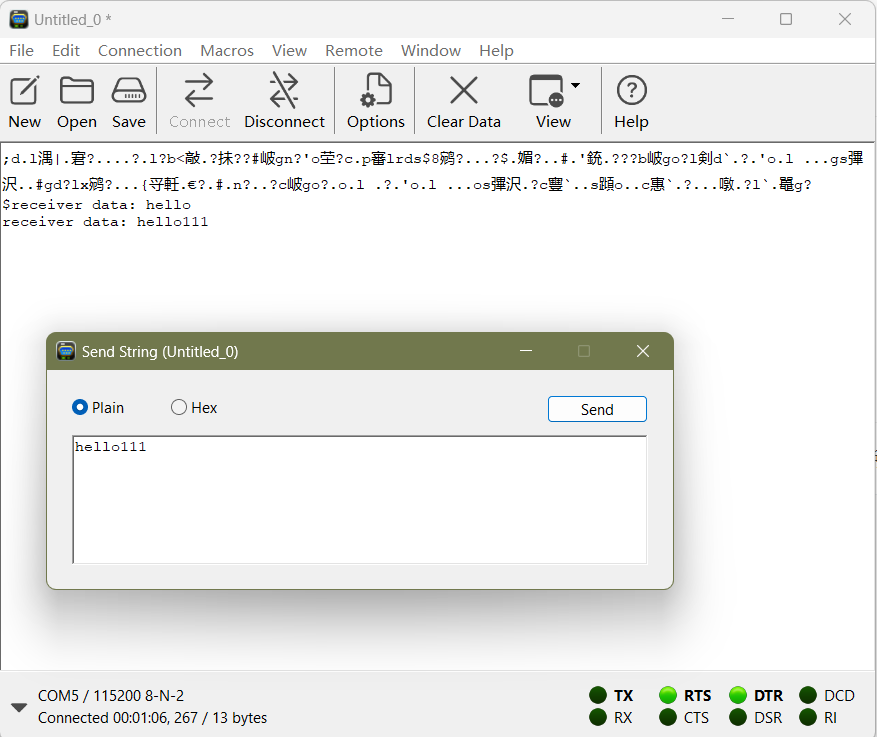
为测试串口通信,为 ESP-12E 编写一个简单程序,功能为转发通过串口接收到的数据,代码如下所示:
#include <Arduino.h>

void setup() {
    // SERIAL_8N2 ( UART_NB_BIT_8 or UART_PARITY_NONE or UART_NB_STOP_BIT_2 )
    // 波特率115200 数据位8 停止位2 无校验
    Serial.begin(115200, SERIAL_8N2);
}

void loop() {
    if (Serial.available()) {
        // 读取接收到的字符串
        String txt = Serial.readString();
        // 串口发送字符串
        Serial.printf("receiver data: %s\n", txt.c_str());
    }
}
将程序烧录到 ESP-12E 上后先使用电脑串口调试软件 CoolTerm 先进行调试,如图 1.1 所示。
2. Android 程序
通过 USB 设备进行 串口通信 的整个流程可以总结为以下 4 点:
- 发现 USB 设备
- 打开 SUB 设备
- 串口配置
- 数据传输
- 结束通信
2.1 发现 USB 设备
将 ESP-12E 与 Micro-USB 数据线连接,Micro-USB 数据线与 OTG 数据线连接, 最后 OTG 数据线与手机连接。设备连接好后即可通过 UsbManager 遍历当前已连接的 USB 设备:
val usbManager = context.getSystemService(Context.USB_SERVICE) as UsbManager?
// 遍历 usb 设备
val devices = usbManager?.deviceList?.values?.toList()
devices?.forEach { usbDevice ->
    println("--> usbDevice.deviceName: ${usbDevice.deviceName}")
    println("--> usbDevice.vendorId: ${usbDevice.vendorId}")
    println("--> usbDevice.productId: ${usbDevice.productId}")
}
vendorId
USB 设备的厂商 ID,Vendor ID的商用需要向 USB组织 申请,可在 Valid USB Vendor IDs (VIDs) 中查询厂商 ID。本文中使用的 CH340 芯片是 南京沁恒微电子股份有限公司 生产的,查询其厂商ID如下:
Nanjing Qinheng Microelectronics Co., Ltd. 6790
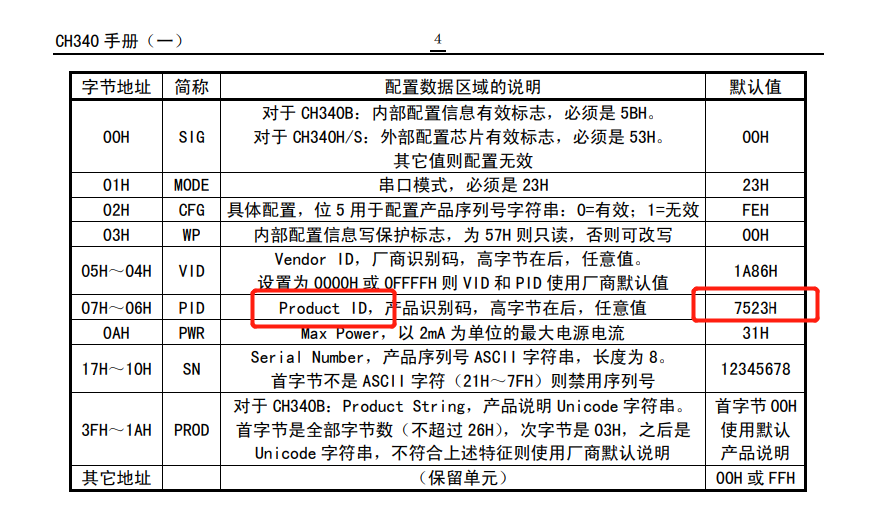
productId
USB 设备的产品 ID,产品 ID 由厂家指定,在 CH340 官方手册 中指明了产品 ID 如图 2.1 所示:
2.2 打开 USB 设备
打开 USB 设备前要先检查是否有范围此 USB 设备的权限,没有访问权限需要先通过 UsbManager.requestPermission(device, intent) 申请访问权限。申请权限后即可通过 UsbManager.openDevice(device) 来打开与设备的连接。
程序与设备之间的通信是通过 UsbInterface (接口) 中的 Endpoint (端点) 来进行的,因此在收发数据前必须通过 UsbDeviceConnection.claimInterface(UsbInterface, Boolean) 声明程序对设备接口的独占访问权。
USB设备 有 4 种 传输模式,分别是 控制传输 、中断传输 、同步传输 、批量传输 ,其中 控制传输 只用于设备的相关控制 (配置),批量传输 通常用在数据量大,对数据的实时性要求不高的场合。
一个 USB接口 中存在多个 USB端点 ,其中端点的类型对应 4 种 传输模式,其中 批量传输端点 存在两种方向,一种是从主机到设备,用于向设备 发送 数据;一种是从设备到主机,用于 读取设备发来的数据。
USB接口中的USB端点不一定四种传输模式都有,本文中使用的 CH340 只有一个USB接口,此USB接口中有 4 个USB端点,分别是控制传输端点、批量传输端点 IN、批量传输端点 OUT、中断传输端点。其中控制传输端点没有被枚举出来,所以UsbInterface.endpointCount值为 3。
var usbDeviceConnection: UsbDeviceConnection? = null
var mReadEndpoint: UsbEndpoint? = null
var mWriteEndpoint: UsbEndpoint? = null
var mDevice: UsbDevice? = null

// 请求连接 ch340 设备
devices?.find { it.vendorId == 6790 && it.productId == 29987 }?.let { device ->
    mDevice = device

    if (!usbManager.hasPermission(device)) {
        // 没有访问设备的权限,先申请访问 USB 设备权限
        val usbPermissionIntent = PendingIntent.getBroadcast(
            context,
            0,
            Intent("${context.packageName}.USB_PERMISSION"),
            PendingIntent.FLAG_IMMUTABLE
        )
        usbManager.requestPermission(device, usbPermissionIntent)
        return
    }

    try {
        // 连接设备
        usbDeviceConnection = usbManager.openDevice(device)
        // 选择一个设备接口 UsbInterface, 此设备只有一个接口
        println("--> device.interfaceCount = ${device.interfaceCount}")
        val dataInterface: UsbInterface = device.getInterface(device.interfaceCount - 1)
        // 声明对设备接口的独占访问权,必须在设备端点 UsbEndpoints 上发送或接收数据之前完成
        usbDeviceConnection?.claimInterface(dataInterface, true)

        // 获取此接口的读写端点
        for (i in 0 until dataInterface.endpointCount) {
            val ep = dataInterface.getEndpoint(i)
            // 使用 bulk endpoint 批量传输端口
            if (ep.type == UsbConstants.USB_ENDPOINT_XFER_BULK) {
                if (ep.direction == UsbConstants.USB_DIR_IN) {
                    // 数据方向是 IN(设备到主机)
                    mReadEndpoint = ep
                } else {
                    // 数据方向是 OUT(主机到设备)
                    mWriteEndpoint = ep
                }
            }
        }
    } catch (e: Exception) {
        e.printStackTrace()
    }
}
2.3 串口配置
串口设备打开后需要配置波特率、数据位、停止位、校验模式才能正确的发送读取数据。 Android 中使用 UsbDeviceConnection.controlTransfer 方法通过 控制传输端点 进行设备配置。常用的 controlTransfer 方法如下所示:
/**
* Performs a control transaction on endpoint zero for this device.
* The direction of the transfer is determined by the request type.
* If requestType & {@link UsbConstants#USB_ENDPOINT_DIR_MASK} is
* {@link UsbConstants#USB_DIR_OUT}, then the transfer is a write,
* and if it is {@link UsbConstants#USB_DIR_IN}, then the transfer
* is a read.
* <p>
* This method transfers data starting from index 0 in the buffer.
* To specify a different offset, use
* {@link #controlTransfer(int, int, int, int, byte[], int, int, int)}.
* </p>
*
* @param requestType request type for this transaction
* @param request request ID for this transaction
* @param value value field for this transaction
* @param index index field for this transaction
* @param buffer buffer for data portion of transaction,
* or null if no data needs to be sent or received
* @param length the length of the data to send or receive
* @param timeout in milliseconds
* @return length of data transferred (or zero) for success,
* or negative value for failure
*/
public int controlTransfer(int requestType, int request, int value, int index, byte[] buffer, int length, int timeout) {
    return controlTransfer(requestType, request, value, index, buffer, 0, length, timeout);
}
上面的 controlTransfer 方法有 7 个参数,分别是 requestType、request、value、index、buffer、length、timeout。
requestType
requestType 是大小为 1 字节的位图,此字段将决定请求的方向、请求的类型和指定的接收者,各数据位表示的含义如下所示:
| 位数 | 第 7 位 | 第 6 ~ 5 位 | 第 4 ~ 0 位 |
|---|---|---|---|
| 取值含义 | 数据传输方向 0 = 主机到设备 1 = 设备到主机 |
请求命令类型 0 = 标准请求 1 = 类请求 2 = 厂商自定义请求 3 = 保留 |
请求命令接收者 0 = 设备 1 = 接口 2 = 端点 3 = 其他 4 ~ 31 = 保留 |
request
USB协议 定义了标准请求,标准请求对所有的USB设备都是通用的。准这些标请求是由 requestType 和 request 共同决定的。详细内容请查看 beyondlogic.org - USB标准 或 USB标准请求。
value & index
value 和 index 字段不同的请求类型表示的含义有所差别,通常可以将 value 和 index 字段认为是请求参数。
buffer & length
在数据的传输中, buffer 作为数据接收缓冲区用于发送或接收数据,而 length 表明发送或接收的数据长度。
timeout
数据传输超时时间
串口配置
配置 CH340 芯片需要使用厂商自定义请求,请求方向是主机到设备,请求命令的接收者为设备,所以 requestType 字段的各数据位取值如下:
| 位数 | 第 7 位 | 第 6 ~ 5 位 | 第 4 ~ 0 位 |
|---|---|---|---|
| 取值 | 0 | 10 | 00000 |
即 requestType = 01000000 = 64。而 Android 中相关常量的定义如下:
// ----------------- 请求类型 -----------------
/**
* Used to specify that an endpoint zero control request is a standard request.
*/
public static final int USB_TYPE_STANDARD = (0x00 << 5);
/**
* Used to specify that an endpoint zero control request is a class specific request.
*/
public static final int USB_TYPE_CLASS = (0x01 << 5);
/**
* Used to specify that an endpoint zero control request is a vendor specific request.
*/
public static final int USB_TYPE_VENDOR = (0x02 << 5);
/**
* Reserved endpoint zero control request type (currently unused).
*/
public static final int USB_TYPE_RESERVED = (0x03 << 5);


// ----------------- 数据传输方向 -----------------
/**
* Used to signify direction of data for a {@link UsbEndpoint} is OUT (host to device)
* @see UsbEndpoint#getDirection
*/
public static final int USB_DIR_OUT = ServiceProtoEnums.USB_ENDPOINT_DIR_OUT; // 0
/**
* Used to signify direction of data for a {@link UsbEndpoint} is IN (device to host)
* @see UsbEndpoint#getDirection
*/
public static final int USB_DIR_IN = ServiceProtoEnums.USB_ENDPOINT_DIR_IN; // 0x80
所以 requestType = UsbConstants.USB_TYPE_VENDOR | UsbConstants.USB_DIR_OUT = 64。
由于是厂商自定义请求 ,request 、value、index 这三个参数的取值需要参考官方配置,请重点查看 CH341 Linux 串口驱动 中的 ch341_tty_set_termios 函数。依据 ch341_tty_set_termios 函数,编写串口配置代码如下:
/**
 * 串口通信配置
 * @param baud - 波特率
 * @param dataBits - 数据位 - 取值 5,6,7,8
 * @param stopBits - 停止位 - 取值 1,2
 * @param parity - 校验类型 - 取值 0 (无校验),1 (奇校验),2 (偶校验),3 (1校验-校验位始终为1),4 (0校验-校验位始终为0)
 */
private fun setConfig(baud: Int = 9600, dataBits: Int = 8, stopBits: Int = 1, parity: Int = 0) {
    val baudPair = splitBaudRate(baud)
    var regValue: Int = 0
    var value: Int = 0
    var index: Int = 0

    // 停止位
    if (stopBits == 2) regValue = regValue or 0x04 // CH341_L_SB
    // 校验类型
    regValue = when(parity) {
        1 -> regValue or 0x08 // CH341_L_PO
        2 -> regValue or 0x18 // CH341_L_PE
        3 -> regValue or 0x28 // CH341_L_PM
        4 -> regValue or 0x38 // CH341_L_PS
        else -> regValue
    }
    // 数据位
    regValue = when(dataBits) {
        5 -> regValue or 0x00 // CH341_L_D5
        6 -> regValue or 0x01 // CH341_L_D6
        7 -> regValue or 0x02 // CH341_L_D7
        else -> regValue or 0x03 // CH341_L_D8
    }

    regValue = regValue or 0xc0
    value = value or 0x9c
    value = value or (regValue shl 8)

    index = index or (0x80 or baudPair.second)
    index = index or (baudPair.first shl 8)

    println(String.format("--> baud rate=%d, factor=0x%04x, divisor=0x%04x", baud, baudPair.first, baudPair.second))
    println(String.format("--> request = 0xA1, value=0x%04x, index=0x%04x", value, index))
    usbDeviceConnection?.controlTransfer(
        UsbConstants.USB_TYPE_VENDOR or UsbConstants.USB_DIR_OUT,
        0xA1,
        value, index, null, 0, 2000
    )
}

/**
 * 拆分波特率
 * @param baud - 波特率
 * @return Pari<Int, Int> - factor to divisor
 */
private fun splitBaudRate(baud: Int): Pair<Int, Int> {
    var a = 0x0
    var b = 0x0
    var c = 0x0
    when(baud) {
        921600 -> {
            a = 0xf3
            b = 0x07
        }
        307200 -> {
            a = 0xd9
            b = 0x07
        }
        else -> {
            if (baud > 6000000 / 255) {
                b = 0x03
                c = 6000000
            } else if (baud > 750000 / 255) {
                b = 0x02
                c = 750000
            } else if (baud > 93750 / 255) {
                b = 0x01
                c = 93750
            } else {
                b = 0x0
                c = 11719
            }
            a = c / baud
            if (a == 0 || a == 0xff) throw Exception("baud rate error")
            if ((c / a - baud) > (baud - c / (a + 1))) a++
            a = 256 - a
        }
    }
    return a to b
}
实际使用串口通信建议使用 CH340官方驱动 或 usb-serial-for-android。
2.4 数据传输
通过 UsbDeviceConnection.bulkTransfer 方法使用批量传输进行数据的发送与接收。
发送数据
private fun send(content: String) {
    val bytes = content.toByteArray()
    val length = usbDeviceConnection?.bulkTransfer(mWriteEndpoint, bytes, bytes.size, 2000)
    println("--> 发送成功: length =$length")
}
接收数据
private fun receive() {
    readThread = Thread {
        val readBuffer = ByteBuffer.allocate(mReadEndpoint?.maxPacketSize ?: 1024)
        val buffer: ByteArray = readBuffer.array()
        while (readThreadState == 1) {
            val len = usbDeviceConnection?.bulkTransfer(mReadEndpoint, buffer, buffer.size, 2000)
            len?.takeIf { it > 0 }?.let {
                val data = ByteArray(len)
                System.arraycopy(buffer, 0, data, 0, len)
                val content = data.toString(Charset.defaultCharset())
                println("--> received data: length = $len, content = $content")
            }
        }
    }
    readThread?.start()
}
2.5 结束通信
当完成与设备的通信或者设备断开连接后,需要调用 releaseInterface() 和 close() 来关闭 UsbInterface 和 UsbDeviceConnection。
private fun disconnect() {
    readThreadState = 0
    try {
        mDevice?.let {
            usbDeviceConnection?.releaseInterface(it.getInterface(it.interfaceCount - 1))
        }
    } catch (e: Exception) {
        e.printStackTrace()
    } finally {
        mDevice = null
    }
    try {
        usbDeviceConnection?.close()
    } catch (e: Exception) {
        e.printStackTrace()
    } finally {
        usbDeviceConnection = null
        mReadEndpoint = null
        mWriteEndpoint = null
    }
}
3. USB 设备连接通知
如果想在手机连接 USB 设备时打开软件相关页面,可在 AndroidManifest.xml 清单文件中添加如下内容:
<manifest ...>
    <!-- 1. 声明应用使用 android.hardware.usb.host 功能-->
    <uses-feature android:name="android.hardware.usb.host" />
    ...
    <application>
        <activity ...>
            ...
            <!-- 2. 接收 USB 设备连接通知 -->
            <intent-filter>
                <action android:name="android.hardware.usb.action.USB_DEVICE_ATTACHED" />
            </intent-filter>
            <!-- 在 device_filter.xml 文件中指定的设备连接后应用才会收到 USB 连接通知 -->
            <meta-data android:name="android.hardware.usb.action.USB_DEVICE_ATTACHED"
                android:resource="@xml/device_filter" />
        </activity>
    </application>
</manifest>
device_filter.xml 文件内容如下所示:
<?xml version="1.0" encoding="utf-8"?>
<resources>
    <!-- ch340 -->
    <usb-device vendor-id="6790" product-id="29987"/>
</resources>
对于单
Activity应用,可在Activity中判断getIntent().action的值是否为"android.hardware.usb.action.USB_DEVICE_ATTACHED"后进行页面跳转。